This is the main view with the acquired SafePages since the last login. This view is also known as “inbox”.
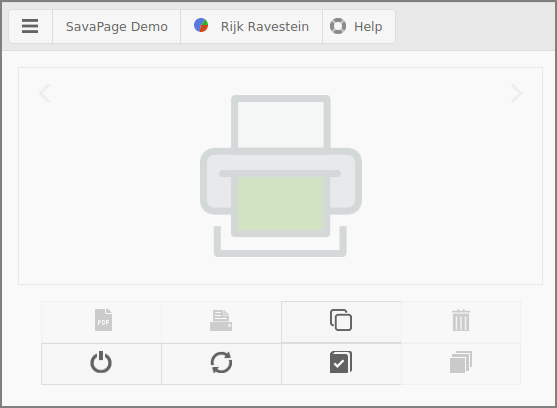
The top bar holds the following items (from left to right):
-
An action button that opens a pop-up menu. For now, the SavaPage logo with the and button is available. See Section 3.13, “GDPR Dialog”.
-
The Community Member name, in our case "SavaPage Demo".
-
A button with the inline pagometer Pie-Chart followed by the id of the logged in user. The blue color in the chart represents the number of pages the user printed to SavaPage. The green color represents the number of pages exported to PDF. The red color depicts the pages printed to Proxy Printers. The button opens a dialog with User Details, including pagometer details.
-
The button opens a custom URL in a new tab. The URL is set with configuration property "
webapp.user.help.url" and is enabled with "webapp.user.help.url.enable" default valueY(disable with valueN).
The two-line center bar holds buttons for the main work-flow. When no SafePages are present, the SavaPage logo is shown, and irrelevant buttons are disabled (these buttons are described at Figure 3.16, “User Web App: SafePages”).
By default, the center bar shows button text on mobile devices only: on desktops a
hover text is shown. You can change this behavior by setting configuration property
webapp.user.main.nav-button-text to value ON
(button text is always shown), OFF (button text is never shown) or
AUTO (button text is shown on mobile devices only).
See Section 4.11.15, “Config Editor” on how to change configuration properties.
Important
Depending on User Privileges and User Roles some buttons might not be shown, replaced (relocated).
The ![]() button brings you to a dialog where you can
create, browse and select letterheads. See Section 3.6, “Letterheads”.
button brings you to a dialog where you can
create, browse and select letterheads. See Section 3.6, “Letterheads”.
Press the ![]() button to get a list of the See Section 3.8, “Log”.
button to get a list of the See Section 3.8, “Log”.
The ![]() button brings you back to the login screen.
button brings you back to the login screen.
Press the ![]() button when, due to whatever reason, the automatic
detection of SavaPage changes fails. This will update the view with the latest
state.
button when, due to whatever reason, the automatic
detection of SavaPage changes fails. This will update the view with the latest
state.
Note
Each print to SavaPage is logged as Document. SafePages that do not match a logged Document are removed. This can happen when a database is restored, or when old documents are deleted after a Database Backup, or Database Command.
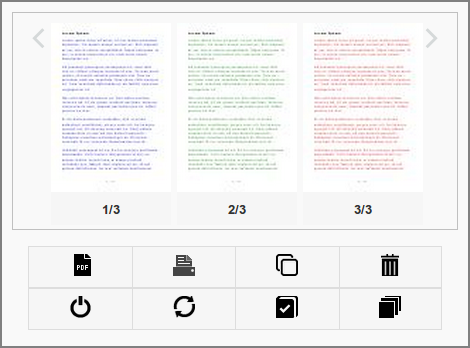
This screen shows the result of a user who printed 3 pages to the
SavaPage printer. The following actions on thumbnails are defined:
-
You can scroll through the thumbnails by dragging them horizontally.
-
A tap on the transparent area "<" or ">" in the top corner of the thumbnail view port scrolls the view a single page to the left or right. A taphold brings the start or the end of the page range in view.
-
A tap (click) opens up a detailed view of the page in the Page Browser: Figure 3.26, “User Web App: SafePage Browser (8 pages)”.
-
A tap on the page number underneath the thumbnail or a taphold on the thumbnail itself, opens the Document Details dialog with rotate, delete and undo actions: Section 3.3.3, “Document Details”.
The following sections describe the actions for the newly enabled buttons:
![]()
![]() When the user is a Job Ticket Creator and
not a Print Job Creator, or Job Ticket Printers
are the only available printers, a Ticket button is shown instead of a Printer
button. Section 3.5, “Print”.
When the user is a Job Ticket Creator and
not a Print Job Creator, or Job Ticket Printers
are the only available printers, a Ticket button is shown instead of a Printer
button. Section 3.5, “Print”.
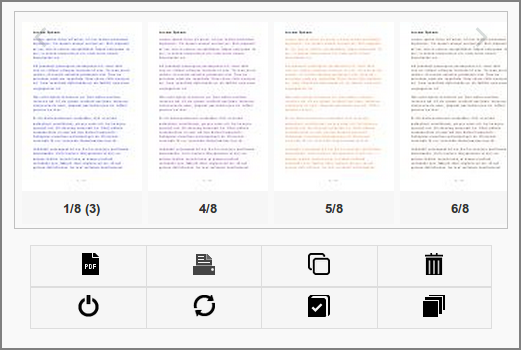
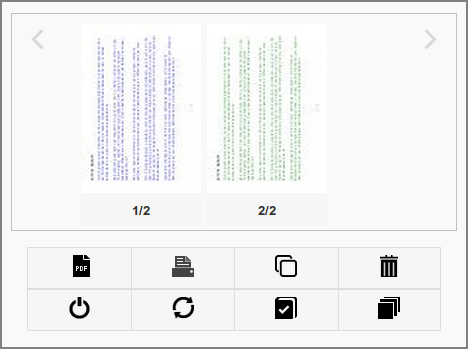
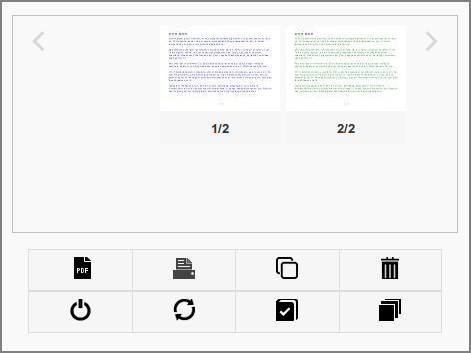
This screen shows the result of a user printing 8 pages to the
SavaPage printer, and illustrates thumbnail
aggregation.
-
Note that only 6 thumbnails are displayed, and that the first thumbnail tells by its numbering that it is the first of a (3) page aggregation.
-
A tap on the first thumbnail will bring the (3) aggregated thumbnails in view. As a side-effect an aggregate will appear at another location in the thumbnail sequence.
-
Thumbnail aggregation is a protection against information (and resource) overload. Imagine what would happen if you printed a 500 page document to the SavaPage printer and ended up with 500 thumbnails. Aggregation gives you the high-level means to easily zoom in and out.
-
A ✎ mark after the page number tells that the page was edited with SavaPage Draw. In case of an aggregated thumbnail, a ✎ mark is shown prefixed with the underlying number of edited pages.
-
As always, a tap on a single thumbnail will bring you to the Page Browser, where you can navigate to any page, sequentially or directly. See Figure 3.26, “User Web App: SafePage Browser (8 pages)”.
When the document expiration time signal is set and expiration for a document is due, every thumbnail of the document is marked with a clock icon in a colored (orange) footer.
 |
When the document is auto-deleted after expiration a notification message us shown.
 |
The footer is positioned at the bottom of the main user panel. The base items are depicted in the figure below.
From left to right:
-
A check-mark icon as indication that the Web App is connected to the SavaPage server. Other icons are shown when the connection is being (re) established or lost. When the server is not down, this usually is a temporary condition due to a network hiccup. Don't worry, SavaPage will automatically restore the connection when the network permits.
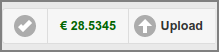
-
The account balance of the logged in user. When you press the button a dialog with User Details is shown, including pagometer details. This button might not show depending on Financial User Privileges.
-
The button is shown if Web Print is enabled. A tap on the button shows the Upload File dialog. This button may have moved to the center button bar, depending on User Privileges.
Note
Depending on User Privileges some buttons might changed, not shown or moved to the main button bar.
If SafePages are present the unique paper sizes of the jobs are depicted in the footer. The text color indicates if a paper size is supported by the selected printer or not. The examples below illustrate how this works.

A4 and A3 jobs are present: a printer is selected that supports both paper sizes.

A4 and A3 jobs are present: a printer is selected that supports solely the A4 paper size. The A3 page is cropped to A4.

A4 and A3 jobs are present: a printer is selected that supports solely the A4 paper size. The A3 page is shrinked to A4.

A4 and A3 jobs are present: a printer is selected that supports none of the paper sizes (or no printer is selected yet).
The number of pages edited with SavaPage Draw are shown in the footer. The example below shows that 2 pages were edited.
A summary of Hold Print Mode jobs and Job Tickets as a result of Proxy Printing is shown in the footer. The example below explains the layout.
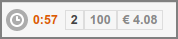
From left to right:
-
The shortest remaining job release time.
-
The total number of hold jobs.
-
The total number of pages to be printed.
-
The total cost charged for printing.
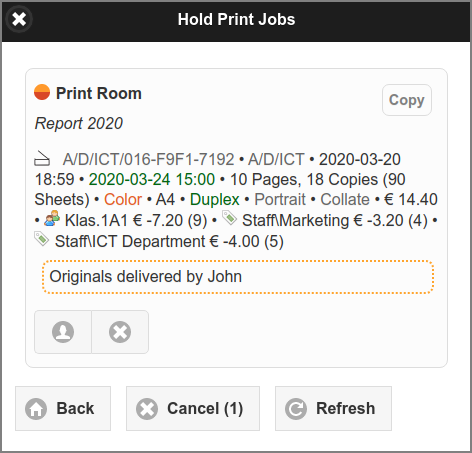
A tap on the summary show a dialog where all Hold Jobs are shown in detail. Each job has three button, from left to right:
-
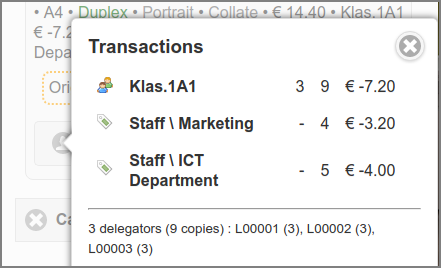
Show invoicing information.
-
Preview the PDF document to be printed.
-
Cancel the job.
And for all jobs:
-
all n jobs.
-
the expiry time of Hold Print Mode jobs.
-
dialog content
More information can be found at:
A Tap on the page numbering below the image pops up the Document Details dialog.
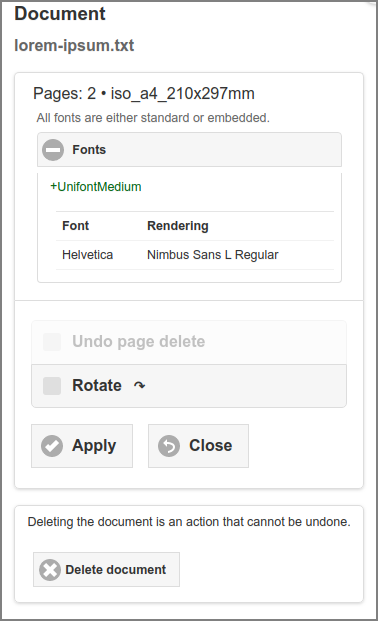
In this example “+UnifontMedium” is an embedded font and “Helvetica”, as one of the Standard PDF Fonts, is rendered as “Nimbus Sans L Regular”. How fonts are resolved in SafePages Documents, depends on Driverless PDF Transfer Processing and PostScript Print Processing.
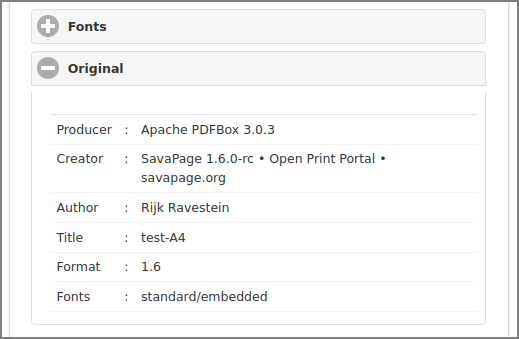
If the PDF document is transferred via HTTP (Upload), the details of the PDF are shown is a separate section. The same details are available in the corresponding item of the Document List.
If document expiration is set the expiration time is shown. See Section 4.11.14.9, “SafePages”.
 |
Note
If Inherit IPP options from print-in document is enabled for Fast Print Mode the IPP Options from PostScript Driver Print-in are displayed.
Press the button in this dialog to delete all pages of a SafePages document, or check and apply to restore the full job in case document pages were deleted. See Section 3.9, “Sort”.
When a user prints to a printer and selects landscape orientation, the print manager of the originating application will translate and rotate the printed content to fit the dimensions of the hard copy target page.
When doing so, it makes assumptions about the (0,0) origin of the logical space on this page. The SavaPage printer driver provides a hint to the print manager about the origin, so it can rotate and translate the pages in a way that is compatible with the SavaPage printer.
Contrary to real printers, where hard copies can easily be rotated by hand, pages produced by the virtual SavaPage printer need special attention, since it is possible that landscape oriented prints rotate the content to portrait oriented images and PDF pages. Probably this is not what you want, so you can ad-hoc rotate job pages in SavaPage to landscape display orientation.
-
This what you might see when you print a job in landscape orientation.
-
Select the Rotate option and press the button to rotate the page and all sibling pages belonging to the same job.
-
The result after rotation is shown in Figure 3.25, “User Web App: Rotated Pages”.
Note
Although the Rotate dialog is triggered from a single SafePage, the rotation affects all SafePages within the same print job.
-
The SafePages after rotation.
Warning
When two WebApps are opened for the same user, the result of a page rotation performed in one Web App will not automatically be shown in the other. The user should do a manual refresh to update the SafePages preview.
A tap on a non-aggregated SafePage thumbnail image will show the page detail in the Browser.
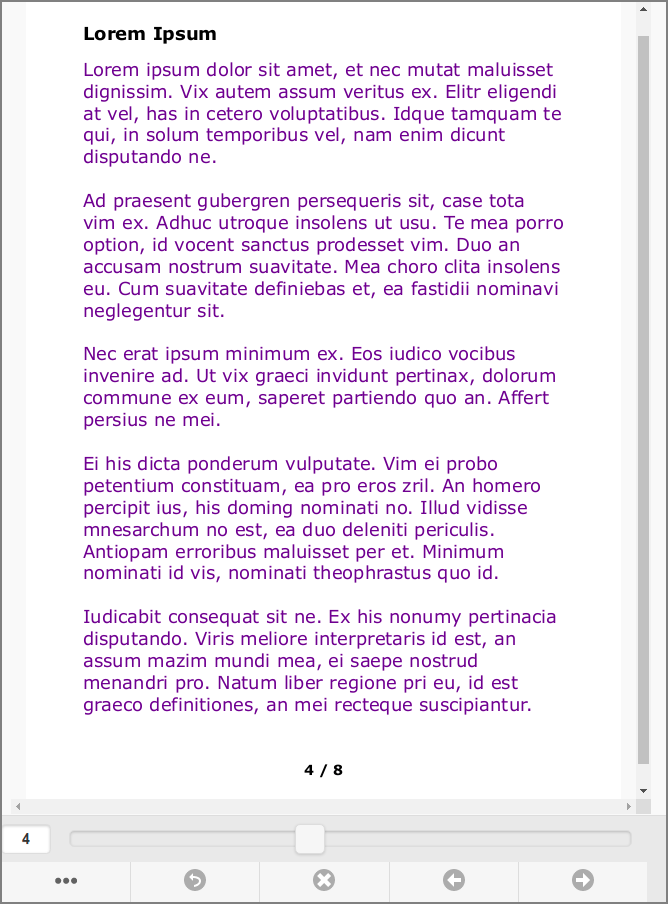
Use the slider control to directly jump to the
page of your choice. Extra actions are available by buttons at the bottom. From
left to right:
-
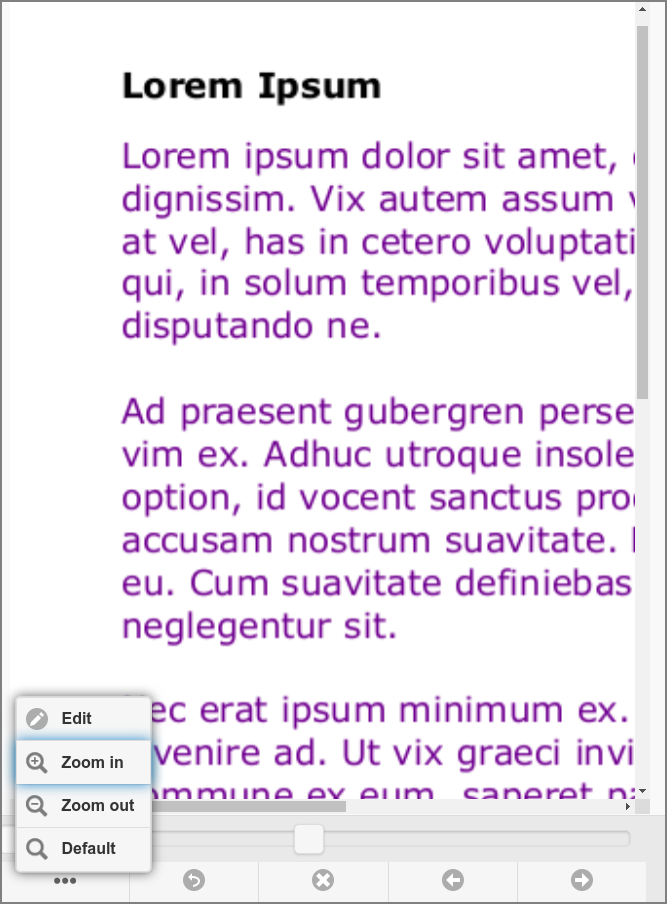
The button opens a menu where you can zoom-in, zoom-out and restore the zoom default. See Figure 3.27, “User Web App: SafePage Browser - Page Options”.
-
Depending on SavaPage configuration and user permission you will see an button to toggle the SavaPage Draw panel.
-
-
The Return button brings you back to the main SafePages screen: Section 3.3, “SafePages”.
-
The X button deletes the page in view.
-
The arrow-left button selects the previous page.
-
The arrow-right button selects the next page.
-
This screen shows the Menu options with Zoom-in applied. Use the standard page scrolling of your browser to scroll the image up/down and left/right.
-
The optional button toggles the SavaPage Draw panel.
If rsvg-convert is installed and a user has SafePages Editor privileges they can draw lines, shapes and text on a SafePage as shown in the example below.
Buttons at the left panel can be used to select properties and draw
lines, shapes and text, as explained in the table below.
| Button | Action |
|---|---|
|
Brush |
Toggles Brush (ON) or Shape (OFF) mode. Brush mode draws a trail with Color, Size and Opacity under the moving mouse pointer while pressing the left mouse button. Shape mode enables the Shape and Text buttons. A drawn Brush trail can be edited by selecting it in Shape mode. |
|
Line, Rectangle Circle, Triangle, Text |
Draws a standard size of the respective Shape or Text at the top left of the page with Border, Fill and Opacity. A Text object is initialized with two sample text lines. The drawn object is selected by default so it can immediately be edited, resized and moved. Note: buttons are disabled when Brush mode is ON. |
| Lock |
Toggles Lock mode for Border and Fill Color. When Lock mode is ON, pressing a Color button does not open the color selection dialog, but just applies the color to the selected drawn objects. |
|
Brush | Border Color |
Selects the Brush or Shape Color (depending on Brush or Shape mode). The selection is applied to any selected object. If Lock mode is ON, the color selection dialog does not open, and the locked color is applied to any selected object. |
|
Size | Border |
Selects the Brush Size or Shape Border (depending on Brush or Shape mode). The selection is applied to any selected object. |
| Fill Color |
Selects the Fill Color of a Shape. The selection is applied to any selected object. If Lock mode is ON, the color selection dialog does not open, and the locked color is applied to any selected object. |
|
Opacity |
Select the Opacity of a Brush or Shape object. The selection is applied to any selected object. |
|
Transparent |
Makes the Fill of any selected object Transparent. |
|
Select all |
Selects all drawn objects (Shape and Brush trails). |
|
Clear selection |
Clears (deletes) all selected objects. |
|
Clear all |
Clears (deletes) all drawn objects. |
|
Restore, Save |
Saves the drawing or restores the earlier saved version. |
Table 3.1. SavaPage Draw - Buttons (top to bottom)
Note
The number of edited pages are shown in the SafePages footer. SavePages thumbnails of edited pages are marked with a small ✎ icon.
Note
SavaPage Draw can be globally disabled by setting configuration property
webapp.user.page-browser.draw.enable =
N
See Section 4.11.15, “Config Editor” on how to set this property.
Caution
The alignment of the drawing does not adjust to a change in Document Rotation.
Warning
Do not use SavaPage Draw as a tool to redact content in PDF exports. Redaction applies only to the visible surface: the underlying elements remain in the PDF and can be inspected with special tooling.