A tap on the button in the main SafePages view shows a dialog with PDF properties and export actions. See Section 3.3, “SafePages”.
Note
All PDF properties (except Passwords) are preserved when the dialog is closed or a PDF is generated, and are re-used when needed in current or future sessions.
-
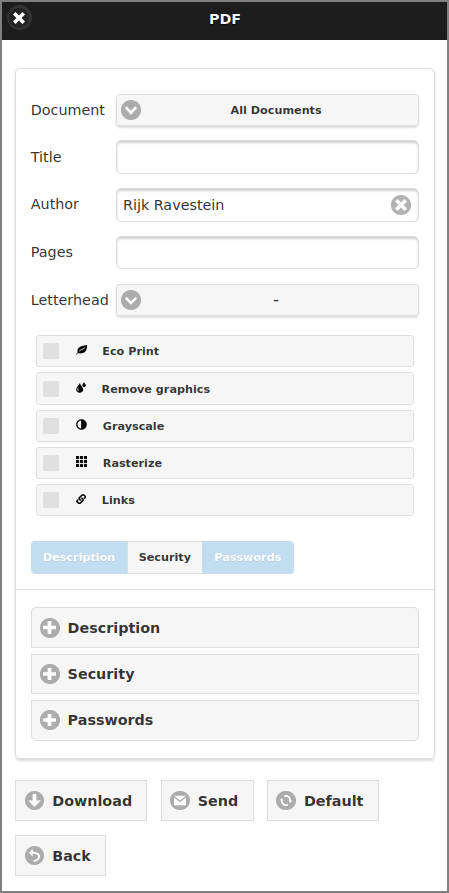
This screen shows the full PDF dialog.
-
The Author defaults to the name of the authenticated user at login, and can be edited.
-
Details are discussed at:
-
A selection of SafePages to incorporate into the PDF output can be entered as a range of Pages. For example:
1-4,6,8-10. The value can be a single page, a range of pages, or a collection of page numbers and ranges separated by commas. The pages will always be exported in ascending order, regardless of the order of the pages in the page-ranges option. The page range is automatically emptied after printing. Be aware that the page ordinals are related to the Document Scope. -
Check one of the PDF Filters or . Additionally check and/or .
-
You can activate a , and setting by toggling the corresponding button in the so-called Apply section. A toggle button is disabled when no setting is specified.
Note
SavaPage tries to translate URL formatted text like “www.example.com” and “info@example.com” to PDF links. Implicit URLs in the source document, such as those contained in text like “click here”, are not sent to the SavaPage printer, and therefore not preserved in the PDF document.
Activate either the or filter option. The last option removes all graphic images from the PDF. When choosing Eco Print the selected SafePages will be ad-hoc converted in the background. While conversion is busy a message box will tell you to wait a while and retry later. Take about 3 seconds per page waiting time into consideration. Automatic filtering may help to diminish waiting times: see Section 4.11.10.2, “Eco Print Settings”. and filters can be selected as extra. The filter creates an image of each PDF page. The DPI can be set with the following configuration properties:
| Configuration property | Description |
|---|---|
|
pdf-out.convert.rasterize.dpi.download |
DPI of rasterized PDF for
. Enum values:
|
|
pdf-out.convert.rasterize.dpi.email |
DPI of rasterized PDF by email. Enum values: see above. |
Table 3.2. PDF Rasterize Filter: Configuration Properties
See Section 4.11.15, “Config Editor” on how to change these properties.
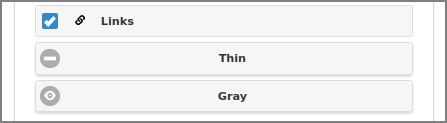
If the option is checked, PDF text recognized as URI is annotated as PDF link and optionally underlined with a thickness and color of your choice. Select “Invisible” to hide underlining.
-
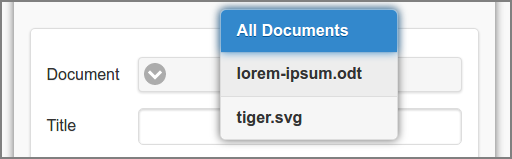
When pressing the Document button you get a selection pop-up with titles of acquired SavaPage print jobs. Tap a job title to restrict the scope of the PDF output to that job. Select the top item All Documents to activate full scope.
-
When full scope is selected the Pages ordinals are related to the SafePages total. When a job is selected as scope, the page ordinals are related to the page total of the job.
-
Selecting a scope initializes the Title text with the job name, or clears it when you choose full scope. You can edit the Title if you wish.
-
If there is just a single acquired SavaPage print job, this job is shown as only option.
Note
When a user rearranged or deleted any SafePages the scope is confined to full scope.
-
Press the button to expand the section.
-
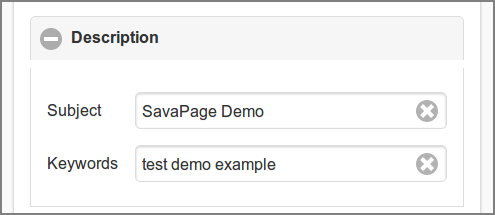
Enter the Subject and (space separated) Keywords of the PDF document.
Note
When a Subject or Keywords are entered, the toggle in the Apply section will be enabled. Use this toggle to apply (or deny) the Description to the generated PDF.
Press the button to expand the section.
When the OpenPGP Key Pair is present on the server, users who have the Privilege to Sign will see the option, When selected, an OpenPGP Signature is applied to the generated PDF.
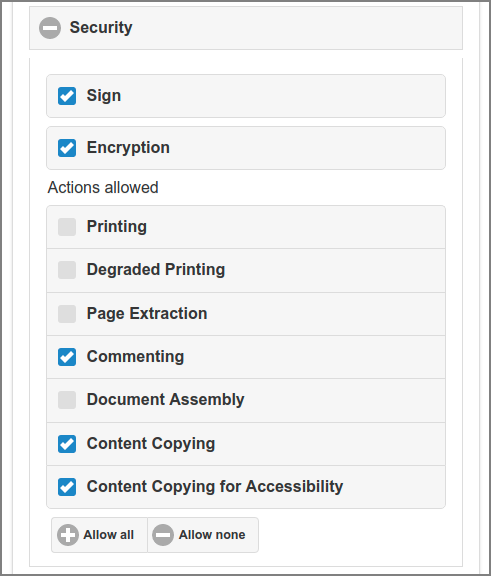
When the option is selected the Actions allowed for the generated PDF are shown. Use the or buttons to select the actions in one go. Or select each allowed action separately. This is a list with the allowed actions, each with a short description:
-
Printing: Printing the document.
-
Degraded Printing: same as Printing, but with a lower quality.
-
Page Extraction: Modifying the contents. For example, changing the contents of a page, or inserting or removing a page.
-
Commenting: Adding or modifying text annotations.
-
Document Assembly: Inserting, removing, rotating and bookmarking pages. The content can't be changed, unless Page Extraction is also selected.
-
Content Copying: Copying or otherwise extracting text and graphics from the document, This also applies for screen readers or other accessibility devices.
-
Content Copying for Accessibility: Extracting text and graphics for use by accessibility devices.
Note
SavaPage uses 128-bit PDF encryption.
When or is selected, the toggle in the Apply section will be enabled. Use this toggle to apply (or deny) the security settings to the generated PDF.

-
The User password (also known as the open password) locks the PDF file for anyone who doesn't know the password.
-
The Owner password (also known as the permissions password) is needed to read the PDF file in order to change the permissions.
-
The maximum password length is 32 characters.
-
If you don't enter a user password, all users will be able to open the PDF document without being prompted for a password. However, the security settings will remain in place.
-
When both PDF user and owner password are entered they must be different.
Important
When a User password is set or Security settings are active, and the Owner password is not set, SavaPage will replace it by a random string.
Warning
Security settings without a User password aren't really secure, since the encryption key is derived from the User password. When the User password is omitted, the content is encrypted as described in the public PDF reference, so decryption is also known in this case (although illegal to practice).
Note
When a User or Owner password is entered, the toggle in the Apply section will be enabled. Use this toggle to apply (or deny) the passwords to the generated PDF.
Note
Passwords are not preserved when the dialog is closed or a PDF is generated, so they can not be re-used in current or future sessions.
-
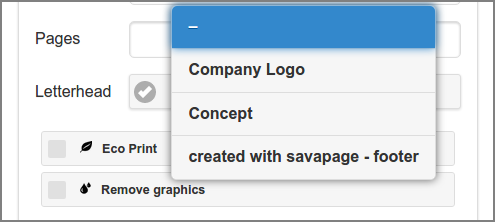
Press the button in the Letterhead section to get a selection pop-up with available Letterheads.
-
Tap on a letterhead title to select it, or select the top item dash to deselect a letterhead.
Note
Depending on User Privileges the Letterhead section might not be shown.
Note
Letterheads are not subjected to PDF Filters but are applied to the filtered result.
-
Press the button to download the SafePages as PDF file, with the properties set in this dialog.
-
Your browser will present a Save dialog so you can save the PDF file in the location of your choice.
-
The default PDF file name will be identical to the Title you entered as PDF property.
Note
Depending on User Privileges the button might not be shown.
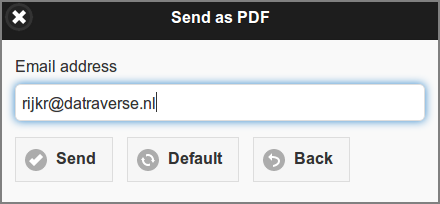
A tap on the button in the PDF dialog, shows this Send dialog. See Section 3.4, “PDF”.
-
Enter the Email address of the recipient.
-
The last used Email address is shown. Press the button to reset the address to the one that belongs to the logged in user.
-
Press the button to generate the PDF document and send it as attachment to the recipient.
Note
Depending on User Privileges the button might not be shown.