A Device is a hardware component with a dedicated function.
SavaPage defines devices of type Terminal and Network Card Reader. They are identified by IP address and, in case of the reader, a port number. The combination of IP-address and Type must be unique.
Note
Although most of the time an IP address will harbor one device type, this constraint does allow that Terminal and Network Card Reader are combined on a single physical device.
-
A Network Card Reader acts as User Authenticator, either at Login or Proxy Print time.
-
A Terminal device runs customized SavaPage Web App Sessions overriding global User Authentication and Proxy Print defaults.
After a tap on the button in the main menu this panel is shown. See Section 4.2, “Menu”.
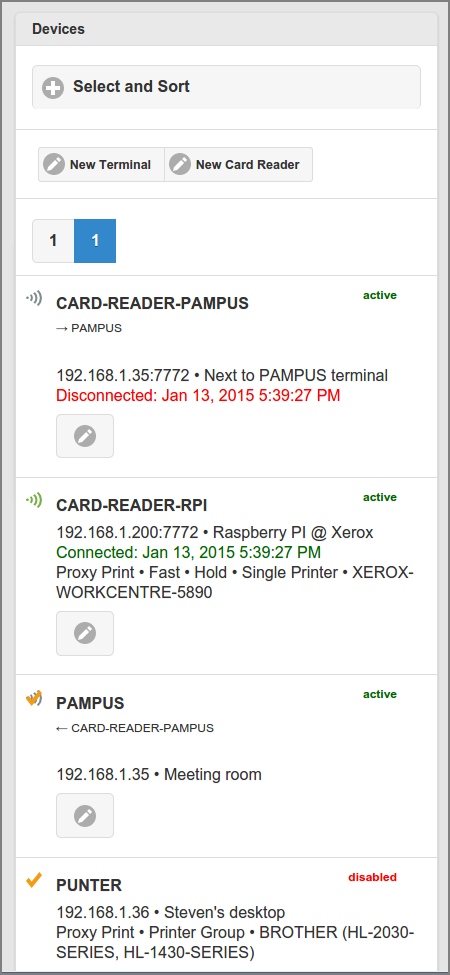
All Devices are listed alphabetically by default. A different selection and sorting can be entered: see Figure 4.79, “Admin Web App: Device - Select and Sort”. Press the or button to create a new Device.
Devices are marked with an icon and hold the following items:
![]() A Network Card Reader used for NFC Card Login at a Terminal.
A Network Card Reader used for NFC Card Login at a Terminal.
-
The name of the Reader.
-
A referral to the Terminal.
-
The IP address, port, and location of the Reader.
-
A time-stamp of the last connection attempt with the status connected (green) or disconnected (orange).
![]() A Network Card Reader used for NFC Card Proxy Print
Authentication.
A Network Card Reader used for NFC Card Proxy Print
Authentication.
-
The name, IP address, port, and location of the Reader.
-
A time-stamp of the last connection attempt with the status connected (green) or disconnected (orange).
-
The Proxy Printer or Proxy Printer Group for which this reader acts as authenticator.
-
The Print Mode of the proxy printer(s): Fast, Hold, Direct.
![]() A Terminal with custom settings.
A Terminal with custom settings.
-
The name, IP address and location of the Terminal.
-
The Proxy Print or Proxy Printer Group for which this Terminal is entitled to print to.
![]() A Terminal with custom settings and a Network Card Reader used
for NFC Card Login.
A Terminal with custom settings and a Network Card Reader used
for NFC Card Login.
-
The name of the Terminal.
-
A referral to the Reader.
-
The IP address and location of the Terminal.
-
The Proxy Printer or Proxy Printer Group for which this Terminal is entitled to print to.
Note
Due to Admin Privileges certain buttons might not be visible.
-
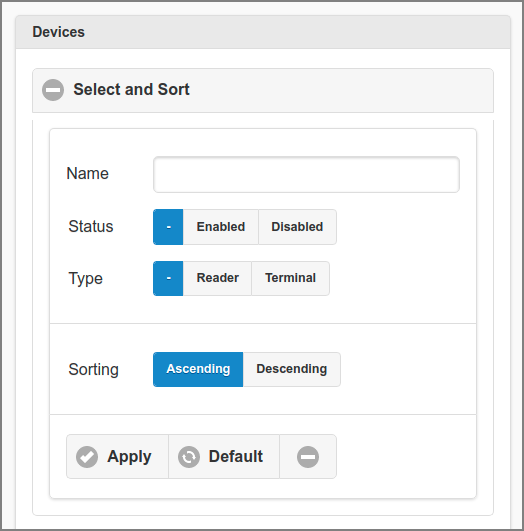
Devices can be selected by entering the containing text (fragment) of their Name. So, entering "CARD-" will select both "CARD-READER-PAMPUS" and "CARD-READER-RPI".
-
Select the Status. The button will select both Enabled and Disabled devices.
-
Select the Type. The button will select both Reader and Terminal devices.
-
The list can be sorted or on device name.
-
Tap the button to (re)display the list.
-
A tap on the button resets the selection and sort fields to their default values.
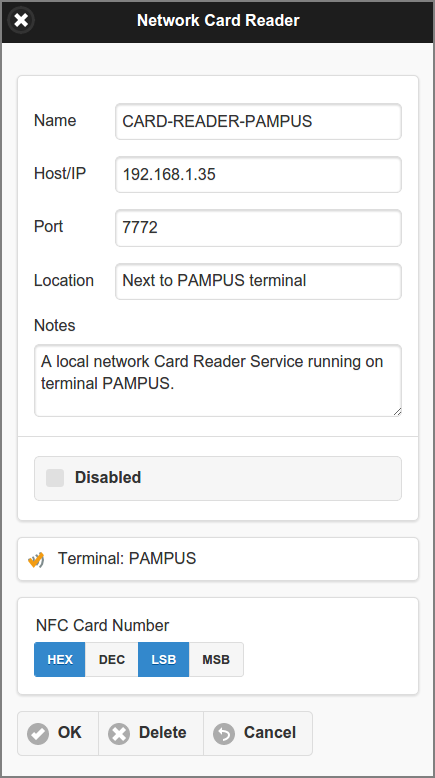
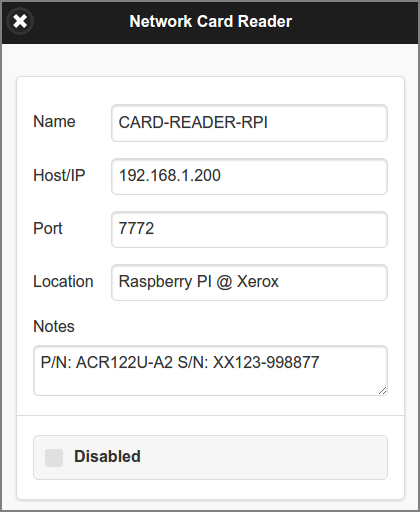
A Network Card Reader device runs the SavaPage Network Card Reader Service .
-
A reader is associated to a Terminal in the Terminal dialog. See Section 4.9.2.2, “Custom User Login”. The associated Terminal is shown here with icon and name.
-
Tick Disabled to disable the Device definition.
-
The format of the NFC Card Number must be specified. See Section B.1, “Card Number Format”.
Note
A Network Card Reader can be used as NFC Card Login authenticator by just one Terminal.
A Network Card Reader can act as print job authenticator for a single Proxy Printer or a Proxy Printer Group.
When the reader device is placed next to the printer device this setup
implements Follow-me Printing.
 |

Checking the Proxy Print Authentication option shows all the detail options. The Print Mode determines the authentication scenario. Basically there are three modi: Fast, Hold and Direct. Fast Mode can be combined with Hold and Direct Mode. See Section 4.9.1.2.4, “Combining Print Modes”.
-
Depending on the Print Mode, the name of a Single Printer and/or Printer Group Target must be selected. Which targets are needed is explained in the Print Mode subsections below.
-
The format of the NFC Card Number must be specified. See Section B.1, “Card Number Format”.
Note
A Network Card Reader can be deployed for just one purpose. Either for Proxy Print Authentication or for Custom User Login at a Terminal Device.
Important
When using Proxy Print Authentication concurrently with the User Web App and User Client you are strongly advised to use an external database like PostgreSQL. See Chapter 21, Using an External Database.
Fast Print Mode applies to a Single Printer and supports the following scenario:
-
User prints one or more jobs to SavaPage. See Chapter 14, SavaPage as Printer.
-
User walks to the printer.
-
User swipes NFC token along the reader.
-
As a result he gets one (1) printed copy of all SafePages jobs according to the default printer settings.
Note
If Inherit IPP options from print-in document is enabled, the IPP Options from PostScript Driver Print-in document(s) are used.
Expired SafePages documents are skipped and cleared. The expiry period is set in Section 4.11.9, “Proxy Print”. A user can extend fast job expiry in the User Web App. See Section 3.5.1, “Printer Selection”.
Expired documents whose deletion is not triggered by Fast Print release are eventually deleted during User Home Clean.
-
A Fast Print clears all SafePages after printing.
-
This scenario does not need any action in the User Web App. Therefore, it is the shortest way to proxy print with SavaPage.
Caution
Fast Print Mode is meant for straightforward proxy printing without intervening editing. So, when users open the Web App and perform a Delete or Sort on their SafePages they are supposed to use Hold Print instead. When a Fast Print is tried on edited content, nothing is printed and all SafePages will be cleared as a result.
Important
When Fast Mode is combined with Hold or Direct Mode, and a Printer Group is specified, one of the printers from the group must be specified as Single Printer.
Tip
For Fast Mode printers with a single tray holding A4 media, PPD Extensions can be used to configure an extra virtual tray for Letter media. See Section K.6.1, “Fast Print A4 and Letter to Single Tray”.
Hold Print Mode applies to a Single Printer or Printer Group and supports the following scenario:
-
User prints one or more jobs to SavaPage. See Chapter 14, SavaPage as Printer.
-
User opens the User Web App and proxy prints to either the Single Printer or one of the printers from the Printer Group.
-
As a result the proxy print job is held.
-
User walks to the chosen printer.
-
User swipes NFC token along the reader.
-
As a result all hold jobs for the printer are printed.
Expired hold jobs are skipped and cleared. The expiry period is set in Section 4.11.9, “Proxy Print”. A user can delete hold jobs or extend expiry in the User Web App. See Section 3.3.2.3, “Hold Print Jobs”.
Expired hold jobs whose deletion is not triggered by print release or an active user session are eventually deleted during User Home Clean.
Direct Print Mode applies to a Single Printer or Printer Group and supports the following scenario:
-
User prints one or more jobs to SavaPage. See Chapter 14, SavaPage as Printer.
-
User opens the User Web App in their mobile device.
-
User selects either the Single Printer or one of the printers from the Printer Group. See Section 3.5.1, “Printer Selection”.
-
User selects printer and job settings.
-
User walks to the chosen printer.
-
User presses the Print button in the Web App.
-
As a result a dialog pops up prompting the user to swipe an NFC Card for authentication. See Section 3.5.6, “Direct Print Release”. User has a 10 second time limit to swipe their card. The time limit is set in Section 4.11.9, “Proxy Print”.
-
User swipes NFC token along the reader.
-
As a result the job is printed.
Combining Fast and Hold Print Mode either in one proxy printer, or over different printers, needs special attention. Namely, if a user creates a Hold Print Job and does not delete the origin SafePages, the same SafePages will remain the target of a Fast Print, leading to duplicate prints. As this may be intended in rare cases, in the majority of cases this will not be intended by the user. To protect the user from unintended duplicate printing the following rules are applied:
-
If Hold jobs exist for any printer, a Fast Print is only done when Proxy Printing is configured to “Always remove SafePages after printing”. This way, because all SafePages are cleared after creating a Hold Job, we know for sure that present SafePages are not part of any Hold Print Job. See Section 4.11.9, “Proxy Print”.
-
As a consequence, when Proxy Printing is not configured to “Always remove SafePages after printing”, all SafePages will be ad-hoc cleared after a Hold Print release. This will prevent that, after all Hold jobs are released at Hold-only printers, and no Hold jobs exist for any printer, remaining SafePages will be Fast Printed anyway.
The Fast + Hold Print Mode supports the following scenario:
-
User creates a Hold Proxy Print Job.
-
All SafePages are removed after printing.
-
-
User prints one or more jobs to SavaPage.
-
User walks up to the Fast + Hold target printer of the Hold Print Job.
-
User swipes NFC token along the reader.
-
As a result:
-
All Hold jobs for the printer are printed.
-
One (1) copy of all SafePages jobs is printed with the default printer settings.
-
When a user created Hold Print jobs for different printers, each supporting Fast + Hold Print Mode, obviously the Fast Print occurs at the first printer visited.
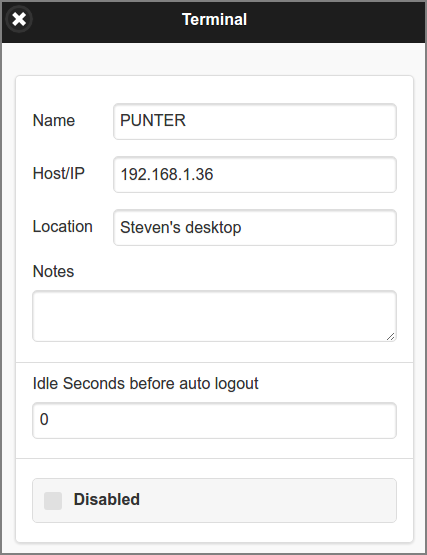
A Terminal runs customized SavaPage Web App Sessions on a specific device.
-
The Idle Seconds before auto logout is targeted at public Terminals and is meant to protect users who forget to logout when done. Enter a number of seconds: the Web App will automatically logout after this period of inactivity. Enter 0 (zero) when no auto logout is desirable.
A Terminal can restrict printing to a single Proxy Printer or Proxy Printer
Group. This is usually done for printers that need to be secured
according to global
Proxy Print
defaults for Non-Secure Proxy Print. When the Terminal device is placed next
to a (group of) printer(s), this setup implements Pull
Printing.
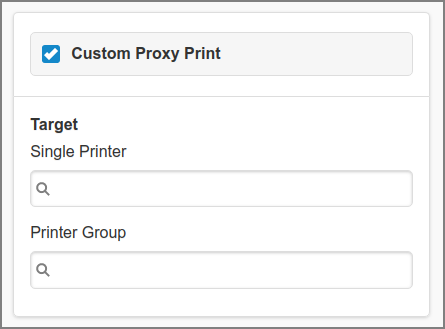
Check the Custom Proxy Print option and search/select the name of a Single Printer or Printer Group Target.
Note
A Proxy Printer assigned to a terminal, directly or by Printer Group membership, can not be accessed on other terminals.
Important
Assigning printers to a terminal does not automatically imply that these printers are available to all users. Eventually, Printer Access Control, User Roles, User Group Roles and User Group Privileges, determines whether or not a user sees a printer.
Tip
A Proxy Printer Group can have members that all point to the same printer device. By restricting access to each member with Printer Access Control you can show a single printer with a tailored set-up to specific User Groups.
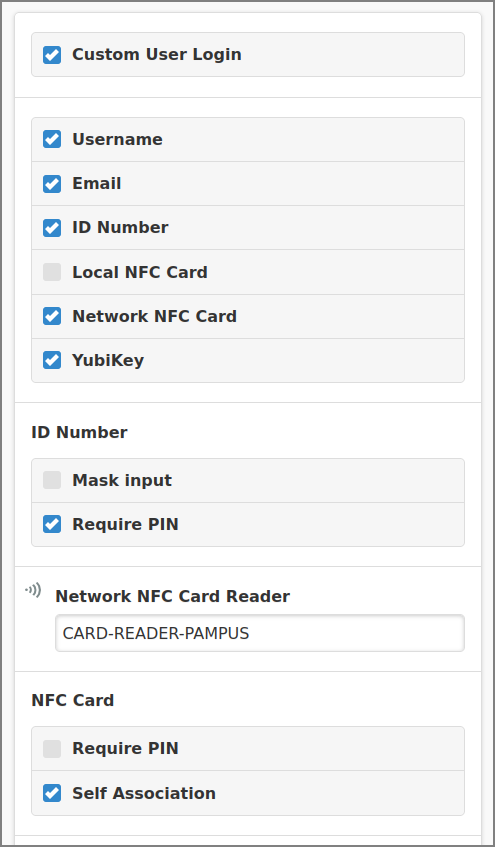
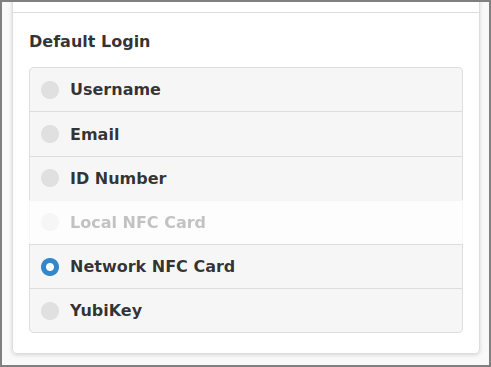
Check the Custom User Login option to override global User Authentication defaults just for this Terminal.
-
The options in these section are identical to the ones in Section 4.11.4, “User Authentication” with the addition of the Network NFC Card option.
-
Enter the name of the Network Card Reader below the Network NFC Card Reader label.
Note
A Network Card Reader can be deployed for just one purpose. Either for Proxy Print Authentication or for Custom User Login at a Terminal Device.