This dialog shows the Pagometers and Financial status of the user, and is shown after a tap on the button in the footer of the main panel.
Note
Depending on User Privileges the Financial section might not be shown.
 |
-
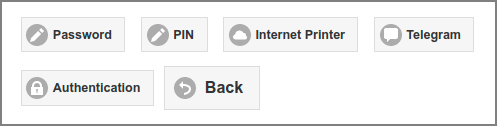
For an Internal User a button is shown, when a password has been set (i.e. not erased): see Section 4.4.5.10, “Password”. A tap on the button will show the Password Reset Dialog.
-
When users are allowed to change their PIN a button is shown. A tap on the button will show the PIN Reset Dialog. Also see Section 4.11.4, “User Authentication”.
-
When an Internet Print
protocol://authorityis present the button is shown. A tap on the button will show the Internet Printer Device URI. -
When Telegram Messaging is enabled the button is shown. It leads you to the Telegram Configuration dialog.
Deprecated
Telegram support is deprecated and will be removed in a next release.
-
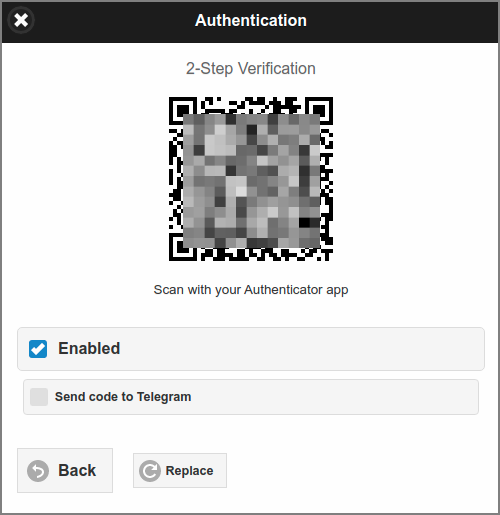
If 2-step Verification is enabled the button is shown. It brings you to the Authentication Dialog.
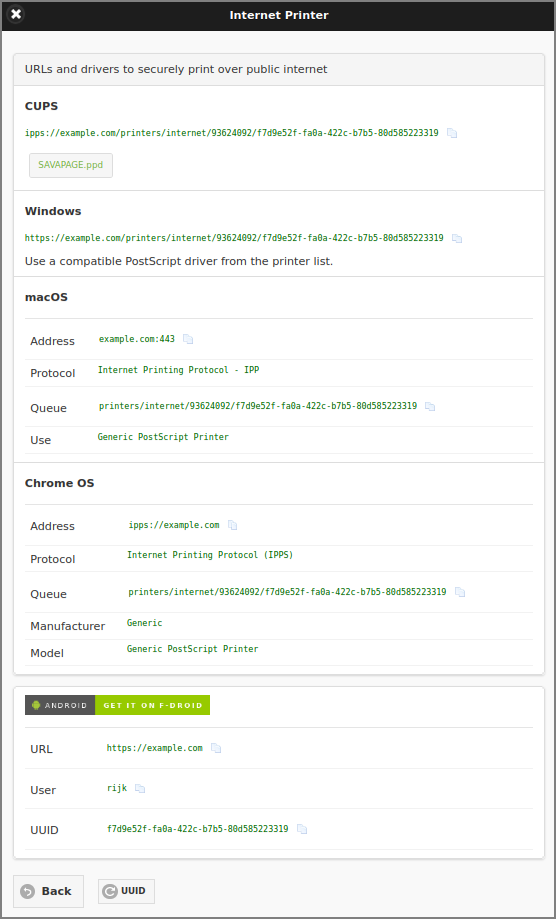
Users can copy/paste their private Internet Print
Device URI for driver print from this dialog. The
SAVAPAGE.ppd file can be downloaded.
This dialog also shows the URL and credentials for macOS, Chrome OS and the SavaPage Android Print App.
The UUID can be replaced with a new one by pressing the button.
Deprecated
Telegram support is deprecated and will be removed in a next release.
This dialog contains a step by step procedure to configure Telegram Messaging for a Telegram ID owned by a user.
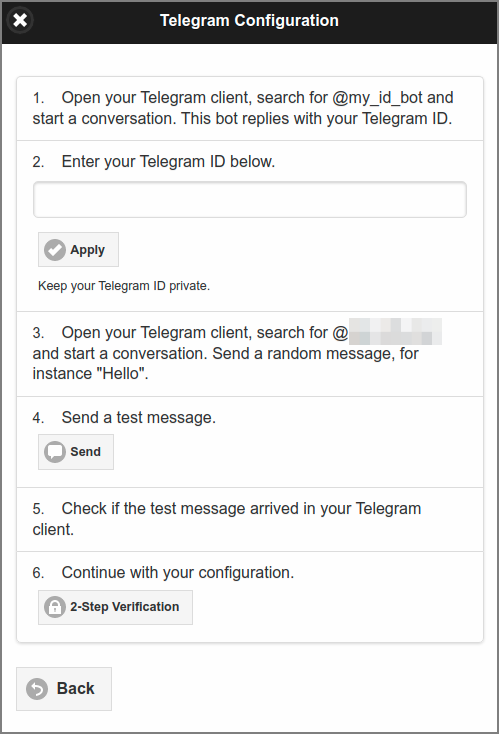
In this dialog 2-Step Verification can be , and the user can their TOTP code. To ensure that the TOTP code is scanned/copied correctly, the user must enter a verification code before pressing the button.
Note
If 2-Step Verification is and User Telegram Configuration is applied, the option is visible: if checked, no Authenticator app is needed and verification codes are send to the user's Telegram ID. However, at this time, you must enter a verification code generated by an Authenticator app.
Deprecated
Telegram support is deprecated and will be removed in a next release.
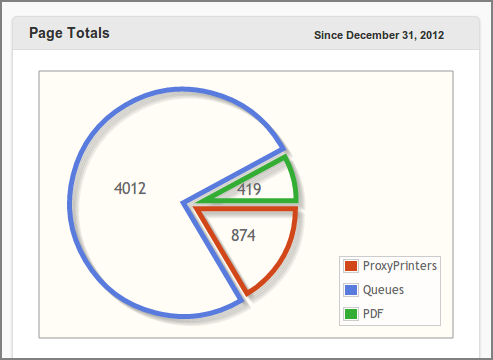
This section shows the personal Pagometers of the user, and are analogous to the ones in the Admin Dashboard as shown in Figure 4.15, “Admin Web App: Dashboard - Pagometer” and Figure 4.18, “Admin Web App: Dashboard - Environmental Impact”.
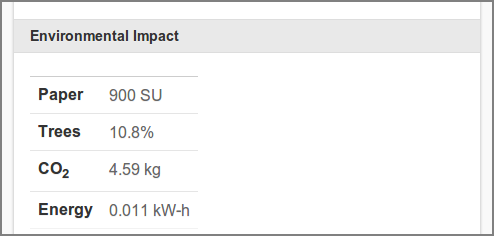
The Environmental Impact section can be hidden
with configuration property in table below.
| Configuration property | Description |
|---|---|
|
webapp.user.show-env-info |
Set to |
Table 3.10. User Web App Environmental Impact Configuration Properties
See Section 4.11.15, “Config Editor” on how to set these items.
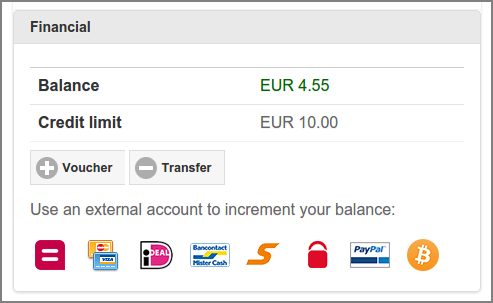
This section shows the financial status of the user account and ways to increment the account balance from an external account.
Note
Depending on User Privileges the section for account transactions might not be shown.
-
Balance: the user's account balance.
-
Credit limit: see Section 4.4.5.8, “Financial”.
-
If PaperCut Personal User Account is enabled, the Balance label is prefixed with the PaperCut icon and Credit limit is not shown.
-
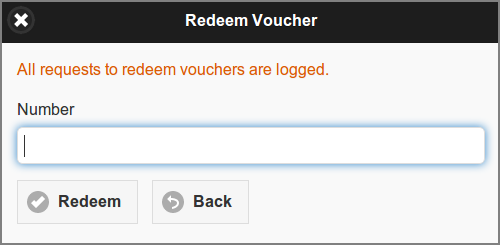
A push on the button opens the Redeem Voucher dialog. The visibility of this button is dependent on an application setting.
-
A push on the button opens the Transfer Credit dialog. The visibility of this button is dependent on an application setting and a Balance amount greater than zero.
When a Generic Payment Gateway Plug-in is enabled, an icon is shown for each active payment method. Pushing (clicking) the payment method icon will pop-up the dialog to Transfer Money.
Note
The dedicated Payment Web App can be used if a Generic Payment Plug-in is enabled.
-
Enter the voucher Number in the dialog box and press . Make sure to enter the number exactly as listed on the voucher including any dashes (-).
-
If you entered the number correctly, the value as shown on the voucher will be transferred to your account and a new entry will list in your transaction log.
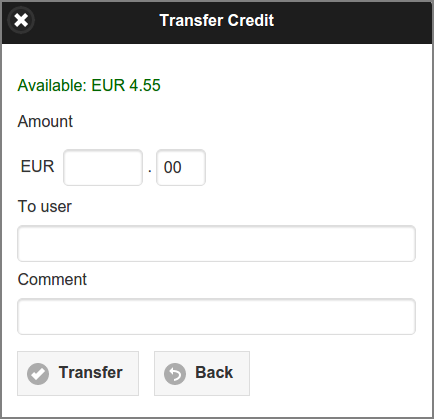
This dialog is used to transfer funds to another user.
-
Enter the Amount in currency units and cents. The available amount is shown in green at the top.
-
Enter the To user id and an optional Comment. A Quick Search for a User ID can be configured for this dialog.
-
When you press the button the amount will be transferred from your account to the account of the target user. New entries will list in your transaction log and the log of the target user.
To configure this dialog see Section 4.11.11.5, “Transfer Funds”.
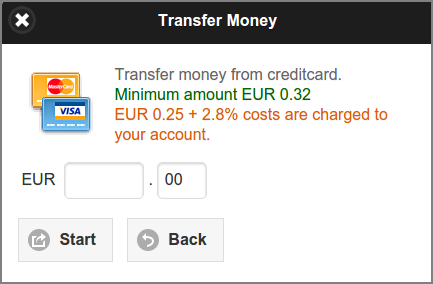
This dialog is used to transfer money from an external account. The figure below shows a dialog in preparation for a credit card transaction. Other payment methods are available as defined by the active Generic Payment Gateway Plug-in. See for example Section M.1.1.1.1, “Mollie Payment Plug-in”.
-
Enter the Amount in currency units and cents.
-
Press the button to start the payment transaction.