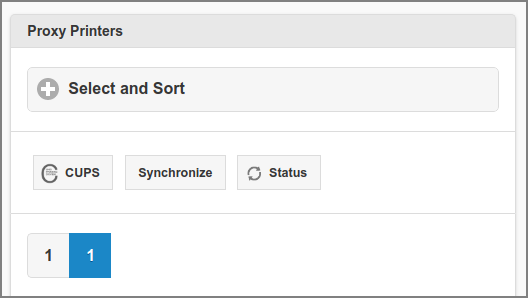
After a tap on the button in the main menu this panel is shown. See Section 4.2, “Menu”.
SavaPage automatically detects CUPS printer queues, and uses their unique name to replicate corresponding Proxy Printers in its database.
When a printer queue is deleted in CUPS it is real-time detected by SavaPage, and as a result the corresponding Proxy Printer is marked as not present. Proxy Printers which are not present are hidden in the User Web App, so they cannot be used for printing.
When a printer queue is renamed in CUPS, two events occur in SavaPage. First, the new name is detected as a new Proxy Printer, and second, the Proxy Printer with the old name is detected as a deleted CUPS queue. Proxy Printers which are not present anymore can either be deleted or renamed.
SavaPage selects local CUPS printer queues by
default. This is a sensible policy since local CUPS queues are able to connect
to locally attached printers (USB, LPT) or network enabled printers. However, in
some odd cases you might want to proxy print to a remote
CUPS queue, i.e. a queue shared by another machine. In that case you
can set the value of the cups.ipp.remote-enabled config item
to Y. See Section 4.11.15, “Config Editor” on how to change
this value.
-
The button is shown when the browser points to “localhost”, “127.0.0.1”, a “.local” address, or to the intranet IP address of the SavaPage server, and host port matches the configured SavaPage port. Click the button to open the CUPS Administration web page in a new browser tab.
-
Click the button to synchronize all CUPS printer options to SavaPage. Since SavaPage does not detect changed CUPS printer defaults, PPD driver and PPD Extension File content (yet), you need to perform this action after you change any of these parameters.
-
The button is shown if Printer SNMP is enabled. Push the button to refresh toner and printer state information for all printers.
-
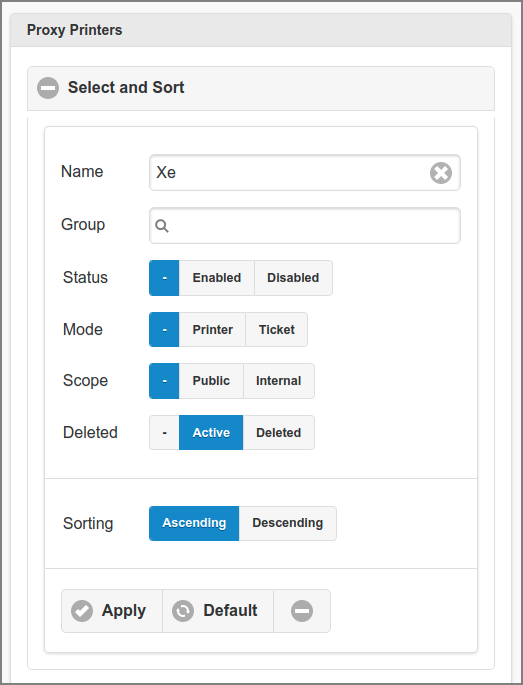
All non-deleted Proxy Printers are listed alphabetically by default. A different selection and sorting can be entered: see Figure 4.67, “Admin Web App: Proxy Printer - Select and Sort”.
-
The list can be traversed by tapping one of the buttons at the pager at the top or bottom of the page.
-
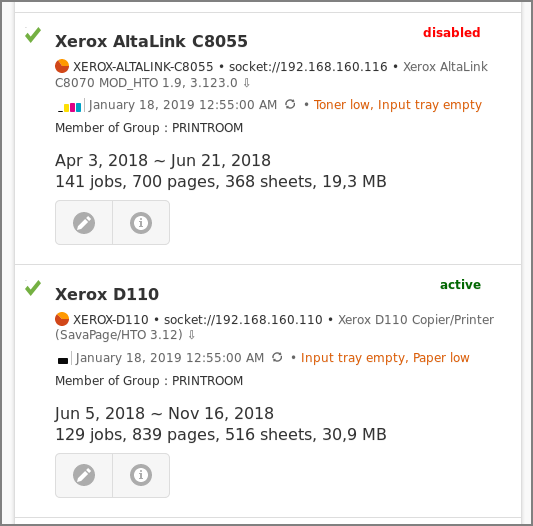
An entry is displayed for each Proxy Printer, with several identifying and usage data. Two sample items are show above (not all data apply). Possible items are, from top to bottom:
-
The Proxy Printer status (at the top right corner).
-
The display name (alias) of the printer as shown to the user.
-
An inline pagometer Pie-Chart followed by the CUPS printer name, URI and PPD driver name.
-
The red color in the chart represents the number of pages printed. The orange color represents the number of printed sheets.
-
A double-click on the CUPS printer name downloads a text file with detailed printer properties, and is used by SavaPage developers and administrators to debug PPD to IPP mapping issues.
-
The PPD Extension File configured in the Proxy Printer Edit Dialog is shown in green: a double-click on its name will download the PPDE file. See Appendix K, PPD Extensions and Appendix L, IPP Extensions.
-
A double-click on the PPD driver name downloads the CUPS PPD file.
-
In case of a Raw Print the configured PPD File and (optional) PDL Transform File are shown: a double-click on their name will download the file.
-
-
If Printer SNMP is enabled, the toner and status information. Click on the icon at the most right to refresh this information. If the printer is marked as not present, this information is not shown.
-
The Printer Groups this Proxy Printer is member of.
-
An inline Line-Graph showing the day pagometers of the printed pages over the last 30 days.
-
An optional red colored “Configuration needed” tag, to remind you to configure at least one (1) of the printer's Media Sources. If the printer is marked as not present, configuration information is not shown. If marked as disabled, configuration information is colored in orange.
-
The period in which activity was accumulated on the pagometer.
-
The pagometer of the Proxy Printer including the number of jobs, sheets and bytes printed.
-
-
Tap the button to edit the entry. Proxy Printers which are present in CUPS can be edited: see Figure 4.68, “Admin Web App: Proxy Printer - Edit - Identity”. Proxy Printers that are not present in CUPS can also be deleted or renamed: see Figure 4.77, “Admin Web App: Proxy Printer - Rename”
-
The button brings you to the list of documents printed to the Proxy Printer. See Figure 4.147, “Admin Web App: Document - List”
-
The button is shown under the same condition as the button. Click to open the CUPS Administration web page for the printer in a new browser tab.
Note
Due to Admin Privileges certain buttons might not be visible.
Important
The CUPS Administration web page must be accessible as explained in
Section 2.3, “Step 3 - Configure CUPS and Samba”. When CUPS
authentication is required you can log in with user name
root or with a user name that belongs to the admin
group.
Tip
The pagometers of all Proxy Printers can be reset at → →
Each Proxy Printer in the list is marked with a primary icon:
|
|
A non-secure Proxy Printer that anyone can print to. |
|
|
A non-secure Proxy Printer that no one can print to. |
|
|
A secured Proxy Printer whose jobs needs to be authorized with a NFC Card swipe on a Network Card Reader.
|
|
|
A Proxy Printer that can only be used from certain Terminals. |
|
|
A Proxy Printer that can only be used from certain Terminals and whose jobs needs to be authorized with a NFC Card swipe on a Network Card Reader on other Terminals. |
|
|
A Job Ticket Printer. |
Table 4.6. Primary Printer Icons
When applicable, the following secondary icons are shown:
|
|
A PaperCut Managed Printer. |
|
|
Print Archive enabled. |
|
|
Print Journal enabled. |
Table 4.7. Secondary Printer Icons
SavaPage can use the SNMP protocol to query information about networked printers, like type/model, serial number, toner and operation status. SNMP is disabled by default. Use the configuration items below to enable and set operational properties. If SNMP is enabled, printer data are read automatically at the daily maintenance cycle at 55 minutes past midnight. See Section O.4, “Daily Maintenance”.
| Configuration property | Description |
|---|---|
|
printer.snmp.enable |
Enable SNMP: |
|
printer.snmp.read.trigger-mins |
Number of minutes since last printer print after which a next print triggers a new SNMP read of printer data (default 240). |
|
printer.snmp.read.retries |
Number of retries after SNMP read failure (default 2). |
|
printer.snmp.read.timeout-msec |
SNMP read timeout in milliseconds (default 1500). |
|
printer.snmp.marker.percent.warn |
reserved for future use |
|
printer.snmp.marker.percent.alert | reserved for future use |
Table 4.8. Configuration Properties for Printer SNMP
See Section 4.11.15, “Config Editor” on how to set these items.
Important
Avahi must be installed to retrieve the hostname of CUPS printers
whose URI refers to a DNS-SD
instance (dnssd:// scheme) in order to
establish an SNMP connection. See Section 1.2.1.11, “Avahi”.
Ensure that DNS-SD (Bonjour) is enabled on these printer devices and that IPP printing has the highest priority. Without these settings, SavaPage cannot trace the host name required for SNMP queries.
For example: in the web interface of an HP printer, enable Bonjour and set “Bonjour Highest Priority Service” to “IPP Printing”.
Tip
Use Server Command printerSnmp to SNMP query any printer available in the network.
The Print Archive is the doc.store.archive.out.print
branch of the Document
Store. It must explicitly be enabled.
The Print Journal is the doc.store.journal.out.print
branch of the Document
Store. It must explicitly be enabled.
Printers that advertise themselves via DNS-SD (also known as Bonjour / Zeroconf) are not automatically part of CUPS. You can easily check: printer devices that show up with the lpinfo -v command do not show up as printer with the lpstat -v command.
Add your DNS-SD printers in CUPS by selecting them there from the list of “Discovered Network Printers”. Make sure to select a Model that uses CUPS filtering and is compatible with your printer. Do not select an IPP Everywhere variant as Model, as this will give you a "Local Raw Printer" throughput without filtering and print job options, which is unusable for SavaPage.
Tip
Placing your DNS-SD printers in a VLAN, which only the SavaPage server can access, prevents these printers from advertising themselves on user devices. If you subsequently add these DNS-SD printers in CUPS, users are forced to use them as Proxy Printer in the controlled environment of the SavaPage User Web App.
A CUPS Class is a group of printers. When printing to it, CUPS will redirect the job to one of the printer members. Which printer would depend on user rights or which printer currently is available.
A CUPS Class appears as a regular Proxy Printer in the list: the number of member printers is enclosed in parenthesis, just after its CUPS name. For CUPS class members, the CUPS classes to which they belong are shown in parentheses.
Important
SavaPage requires that CUPS Class members all have the same PPD.
-
Proxy Printers can be selected by entering a fragment of their CUPS or display Name. So, entering "Xe" will select both "Xerox AltaLink" and "Xerox D110".
-
Select a Status, Mode, Scope or Deleted option. In each case the button will select both option values.
-
The list can be sorted Ascending or Descending on display name.
-
Tap the button to (re)display the list.
-
A tap on the button resets the selection and sort fields to their default values.
-
The minus button collapses the section.
-
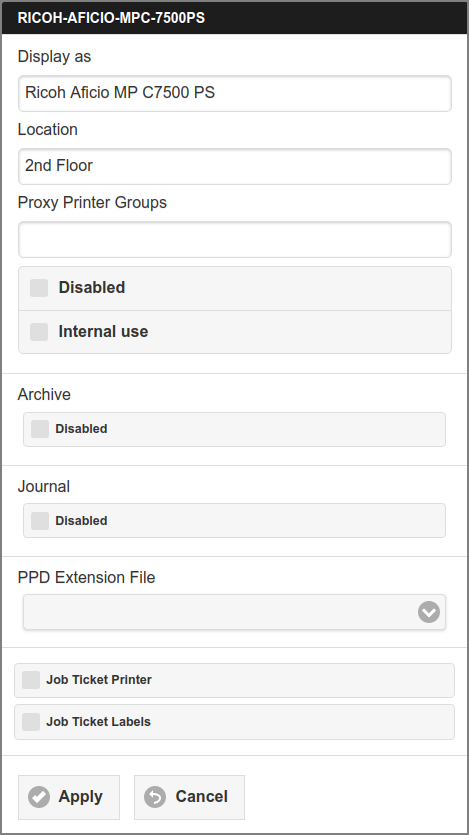
The title bar shows the CUPS Printer Name.
-
The Display name and Location are editable.
-
Multiple Proxy Printer Groups can be entered separated by space, comma, colon or semicolon.
-
Tick the checkbox to disable access to the Proxy Printer for all use.
-
Tick the checkbox to mark the printer for internal use only. This will disable access to the Proxy Printer from the User Web App, but the printer can still be used for internal print work flow scenarios.
-
If the Print Archive and/or Journal function is enabled it can be for this printer. See Section 4.11.14.10, “Document Store”.
-
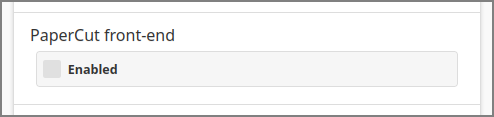
If displayed, tick the checkbox to enable this printer as PaperCut front-end. See Section N.2, “Delegated Print to PaperCut Front-end”.
-
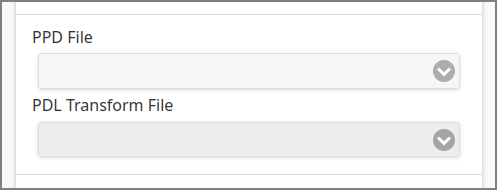
If the Proxy Printer represents a Raw CUPS Queue, the PPD File and an optional PDL Transform File can be selected. See Section 4.8.4, “Raw Print”.
-
The optional PPD Extension File can be selected from a list with
.ppdetext files with extensions to the assigned PPD in CUPS. This is the way to map vendor specific PPD options to IPP attributes. See Appendix K, PPD Extensions.-
Note: This file is required to configure a Raw Print.
-
-
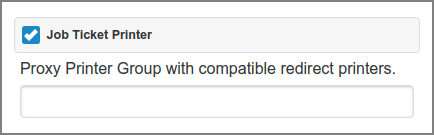
By ticking the checkbox the printer will act as Job Ticket Printer and its display name will be shown to users with role Job Ticket Creator for printer selection. An entry field is shown where you must enter the Proxy Printer Group containing the printers the Job Ticket print job can be redirected to. See Section 4.8.3, “Printer Groups” and Chapter 5, Job Tickets Web App.
This option can not be selected for PaperCut managed printers (a warning message is displayed).
-
When the option is not selected, you can still activate , at least when they are enabled as configuration property: see Section 3.5.9.1, “Configuration Properties” (when tags are disabled, the option is not shown). When this option is activated a user can select a Job Ticket Labels for this regular proxy printer: see Section 3.5.5, “Print Job Settings”. The selected labels are shown as CUPS job ID prefix.
-
Press the button to commit the changes and return to the Proxy Printer List.
-
The button brings you back to the Proxy Printer List without changing anything.
Important
When the content of the PPD Extension File is changed, you must Synchronize the Proxy Printers to take those changes into effect.
See Section 3.5.9, “Job Ticket Print” for an explanation of Job Tickets and how users can create them. Also see Chapter 5, Job Tickets Web App and Section A.3.1, “Delegated Print - (Non) Secure & Job Ticket Scenarios”.
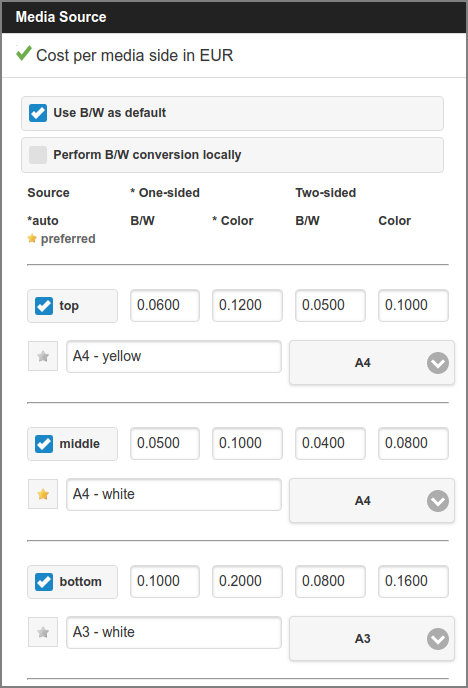
Printer costs are specified per media side and can be set for One-sided and Two-sided prints and differentiated for B/W (Black and White) and Color printing.
When SavaPage calculates the cost of a Proxy Print job, the two-sided (duplex) page cost is only applied to pages that are part of a sheet that is printed on both sides. So, for a document with an odd number of pages, the two-sided cost is not applied to the last page. For example, when a 7 page document is printed as two-sided, the two-sided cost is applied to the first 6 pages, and the one-sided cost to the last.
Costs are displayed, and can be entered, with a precision (number of decimals) as defined in Section 4.11.11.2, “General Financial Options”.
Printer costs are irrelevant and ignored in the following cases:
-
When this is a and Job Ticket Media Costs are defined in the PPD Extension File.
-
When a printer is selected from the Job Ticket Print dialog (Job Ticket cost is leading).
-
When PaperCut cost is leading. This is the case for a PaperCut Managed Printer, and when all conditions below are met:
-
This is a Non-Secure Printer (Secure Printing must be enforced by PaperCut). See Section 4.11.9, “Proxy Print”.
-
PaperCut Integration is enabled.
-
One of these two conditions is true:
-
PaperCut Delegated Print Integration is enabled, and a Print Job is not charged to a Personal Account, but to a Shared Account or via the Delegated Print - PaperCut Scenario.
-
PaperCut Delegated Print Integration is disabled and Personal Print to PaperCut is enabled,
-
For a Document Log example, see Figure 3.53, “User Web App: Delegated Print - Group copies”.
-
In case Printer Costs are relevant, you can assign Media Size and Costs to Media Sources.
Warning
If no Media Source is configured, a red colored “Configuration needed” tag will show up for this printer in the Proxy Printer List and the printer will not be available for printing.
-
The header text “Cost per media side ...” is prefixed with the same printer marker icon(s) as shown in the Printer List.
-
CUPS printer defaults are indicated in the header with an asterisk (
*). In some odd cases the CUPS printer color mode default “grayscale” is not correctly transferred as IPP attribute. You can easily correct this behavior by setting the option at the top of the Media Source section. Instead, you can also use a PPD to IPP mapping to set the default for the IPPprint-color-modeattribute: this correction is more basic, and is immediately reflected in de default*indicator. -
When the option is set, grayscale print jobs are converted to B/W before sending them to a color capable proxy printer. This setting is needed when you observe that print jobs with color content are printed in color, despite the Grayscale Color Mode setting in the Printer Settings dialog. Indeed, some PPDs expect grayscale conversion is done client-side.
-
This option is not available for a .
-
-
The
*autotext below the Source header indicates that the printer supports automatic tray selection based on media options. -
Each entry in the list has a checkbox with the IPP attribute keyword of the Media Source.
-
Tick the checkbox to enable the media source, and enter a user-friendly name as will show up in the Media Source picklist of the Printer Settings dialog.
-
Select the Media Size that is present in the Media Source.
-
Specify the costs. Notice that only those cost cells are enabled that are applicable for the printer.
-
You can mark a media source as preferred by pressing the “Star” button at the left. A preferred source is taken as default in situations where multiple media sources contain the same requested media size. For instance, in Job Ticket Redirect Printer settings.
Warning
Depending on the PPD file used for the CUPS printer, some media sources might not be applicable. You are advised to do some tests to make sure that media sizes are indeed applicable to the media sources as you intended.
-
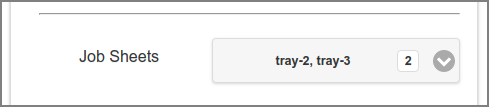
When the printer is member of at least one Job Ticket Printer Group, and can therefore act as redirect printer, a media-source select menu for Job Sheets is shown. Multiple media-sources with assigned media-size can be selected.
-
When this printer is selected as redirect printer, the first Jobs Sheets media-source that matches the requested job-sheet media size will be selected as default. See Section 5.2.6, “Job Ticket Print”.
-
-
The select menu is shown even if org.savapage-job-sheets is not configured in any job ticket PPDE file.
-
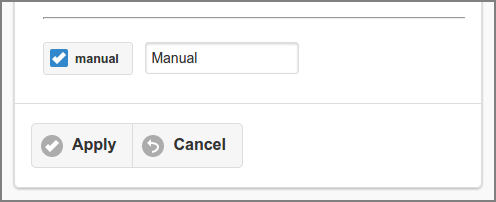
Costs for the manual media source can not be entered here, but must be specified as described in the next section.
In case Printer Costs are relevant, you can specify the Proxy Printer media costs for the manual media source. You can either use a or definition.
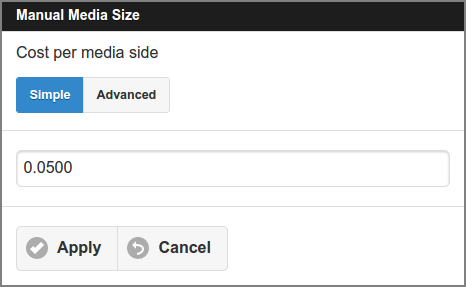
The definition allows for a single cost per media side. This is appropriate for a non-duplex monochrome Proxy Printer that can handle a single media size (Letter or A4) only.

mode is best suited for a duplex color Proxy Printer that can handle multiple media sizes.
-
The list of supported media sizes is dependent on the Proxy Printer type.
-
Use the check-box at a media size to enable its custom cost specification.
-
Costs for unspecified (disabled) media sizes fall back to the Default specification.
Printer Groups allow administrators to combine Proxy Printer instances so they can be addressed as group by a single tag. A Proxy Printer can have one or more groups tags. See Section 4.8.2, “Edit Proxy Printer”.
Printer Groups are used to customize access to Proxy Printers. See:
Note
Printer Group tags are added to the database on first use. Tags without Proxy Printer members are removed from the database at the start of the application and thereafter in a Daily Job.
If the CUPS printer (or class) represents a Raw Queue, a PPD File and an optional PDL Transform File can be selected. See Section 4.8.2, “Edit Proxy Printer”.
A PPD File must have the ppd file
name extension and be located in the
/opt/savapage/custom/rawprint/ppd/ directory.
The PPD is required so that SavaPage can generate the
PDL and send it to the CUPS printer.[19] spoolfile. The cupsfilter command is used to
produce the PDL.
Important
The PPD File is not interpreted by SavaPage to extract the IPP
printer options. A PPD to
IPP Mapping is needed and must be done manually, put in a
.ppde file and selected as well. See Appendix K, PPD Extensions.

Preview
PDL Transform File is a Feature Preview that is partly operational and impermanent. The preview is offered to provoke feedback based on real world use. Please tell us your requirements.
A PDL Transform File can be applied to change the
content of the PDL spoolfile before it is send to CUPS.
The file has JSON format, must have the json file name
extension and be located in the
/opt/savapage/custom/rawprint/transforms/
directory. Use of this type of file is optional.
The transform defines a simple search and
replacement of words in the @PJL header. The
replacement is a reference to one of the following
IPP PRINT_JOB operation attributes:
requesting-user-name, job-name and
copies. For
example:
{
  "@PJL" : {
    "header" : {
      "replace" : [ {
        "search" : "&user;",
        "replacement" : "requesting-user-name"
      }, {
        "search" : "&title;",
        "replacement" : "job-name"
      }, {
        "search" : "&copies;",
        "replacement" : "copies"
      } ]
    }
  }
}
If a Proxy Printer is removed from the host system it is marked in the list as not present. When editing new options appear, as is shown in the screenshot below.
-
See Figure 4.68, “Admin Web App: Proxy Printer - Edit - Identity” for a description of the basic edit options.
-
Tick the button to logically delete the Proxy Printer. It will be physically deleted from the database when no related job history is present anymore. This situation will automatically occur when you enabled automatic backup in combination with the delete of old document logs. Deleting makes sense if the queue is permanently removed from CUPS, and you don't want the Proxy Printer list in the Admin Web App to be cluttered with out-of-date "not present" Proxy Printers.
-
Press the button to commit the changes and return to the Proxy Printer List.
-
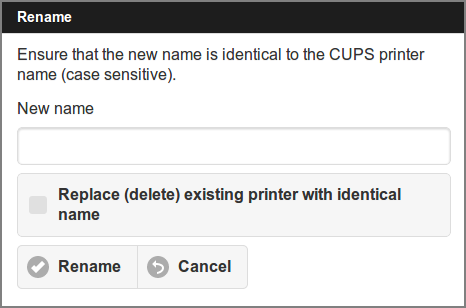
You can change the associated CUPS printer by entering a New name. Renaming makes sense as a mirroring action of renaming a CUPS queue. After renaming a printer in CUPS, the Proxy Printer associated with the old CUPS name will be identified by SavaPage as "not present", and a new Proxy Printer for the new CUPS queue will be created. At this point you can re-associate (rename) the old CUPS name of the Proxy Printer to the new one. This will work as long as no job history is already accumulated on the Proxy Printer associated with this new CUPS name. To overrule this constraint you can tick the Replace (delete) existing printer with identical name checkbox, so an existing Proxy Printer associated with the same (new) CUPS name will be deleted and replaced.
-
Press the button to commit the renaming action and return to the Proxy Printer List.
-
Both buttons bring you back to the Proxy Printer List without changing anything.
Caution
If SavaPage detects a CUPS queue whose name is identical to a logical deleted Proxy Printer, the logical delete mark will be removed and the Proxy Printer will be re-activated.
[19] Page Description Language (PDL) is a computer language that describes the appearance of printed pages for a specific printer model or type, enabling the printer to produce the actual printout.