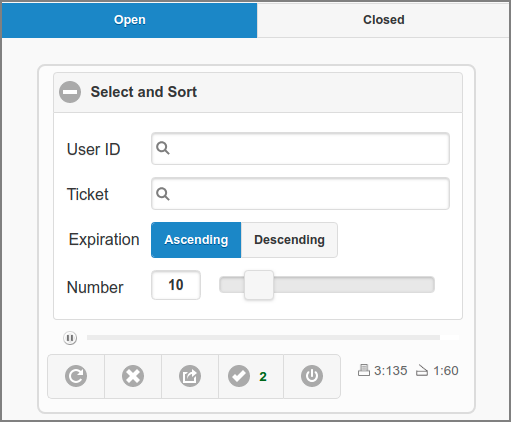
A list of pending Job Tickets is shown that refreshes automatically every 60 seconds. The tiny progress bar at the bottom of the Select and Sort section shows when the refresh is due.
-
You can pause/resume the refresh by toggling the tiny button at the left of the progress bar.
-
You can Quick Search Job Tickets for a single User ID. Leave empty to select all users.
-
You can Quick Search for a single Ticket Number. When a User ID is selected, tickets of just this user are shown. Leave empty to select all tickets.
-
Tickets are sorted in the following way:
-
or on Expiration time.
-
Ascending on Submit Date.
-
Ascending on Job Ticket Creator.
-
Ascending on “chunk-index”.
Tickets that have identical values for 1, 2 and 3, are part of a single chunk, and are displayed together, even if this exceeds the Number limit of tickets shown. When a chunk contains more than one (1) ticket, the “chunk-index” and “chunk-size” are displayed for each ticket in the chunk. For example, for a chunk-size of 3, tickets in the chunk are marked as: “1 / 3”, “2 / 3” and “3 / 3” .
-
-
The Number of tickets shown in the list is limited, and can be controlled with a slider. The slider range and default can be set with configuration properties.
-
At the bottom right, a small printer and copier icon is shown with the total number of pending print/copy tickets and number of sheets to be printed.
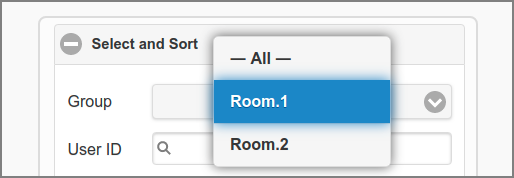
When one or more Job Ticket printers are member of a Proxy Printer Group,
these groups can be used to select tickets. When a
Group is selected, just the tickets from printers
that are member of this group are shown. If no groups are defined in Job
Ticket printers, the Group selection is not visible.
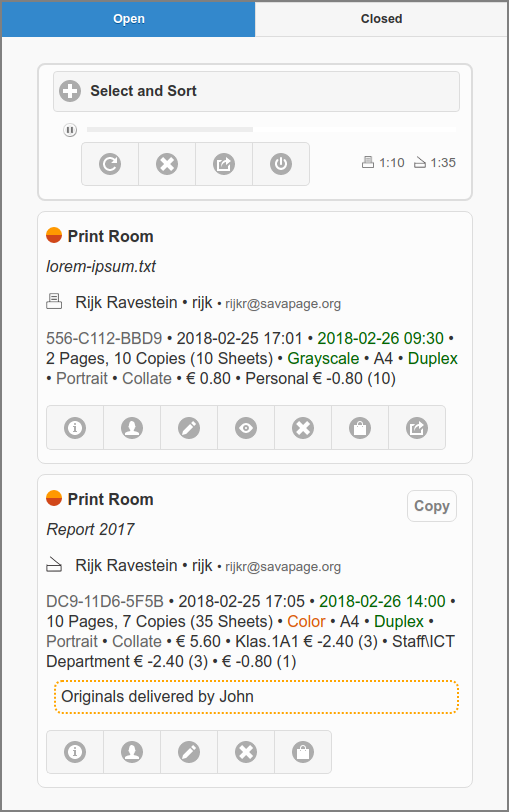
Each Job Ticket in the list shows a summary of options. Some are marked with outstanding colors.
-
For instance, paper size (media) that differs from Default Paper Size (usually A4 or Letter) is marked with an orange-brown color.
When the page size of the PDF document to be printed differs from the Media Size of the print, both sizes are displayed. For instance, “A3 > A4 • Scaled” means that the PDF A3 source is scaled down to an A4 print.
Below the details there are buttons for further actions. From left to right:
-
shows a dialog with a summary of printer settings.
-
shows the Transactions Dialog with accounting details where number of copies can be edited.
-
shows the Edit Dialog, so job options can be changed.
-
downloads the PDF document to be printed.
-
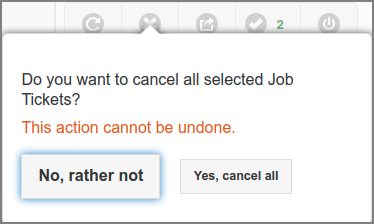
shows a dialog to confirm cancellation of the Ticket. A reason can be entered. After cancellation the user is optionally notified by email or a Notification Plug-in: see Job Ticket Configuration Properties.
-
shows the Settle Dialog, so the job can be charged, when not printed from the Print Dialog, but from the PDF viewer, after .
-
shows a Print Dialog with compatible printers to redirect the job to.
Note
When pop-up dialogs are visible, automatic list refresh is paused.
Note
Reopened Job Tickets are marked as such.
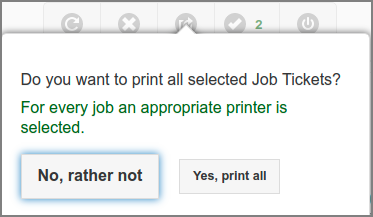
The scope of the , and is the visible list selection. This bulk action must be confirmed in a pop-up.
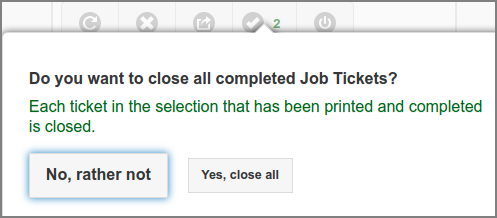
The and actions are enabled by default and can be disabled by setting a configuration property.
The action selects a random compatible printer from the Job Ticket Proxy Printer Group for each Job Ticket.
-
The selected printer must support automatic media source selection, since this option will be used for the print job. In this way, media (implicitly) selected through the job ticket media-source, will be printed from the intended tray.
-
The action is enabled by default and can be disabled by setting a configuration property.
This dialog pops up after pressing the button in a Job Ticket List Item.
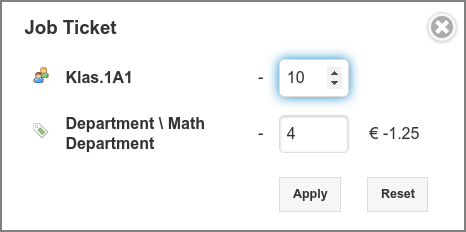
The number of copies for each account can be edited. If a number is
changed, its transaction cost is hidden and the and
buttons are enabled.
Note
A single Personal account transaction is display only. Its copies can be edited in the Job Ticket Edit Dialog as job option.
This dialog pops up after pressing the button in a Job Ticket List Item.
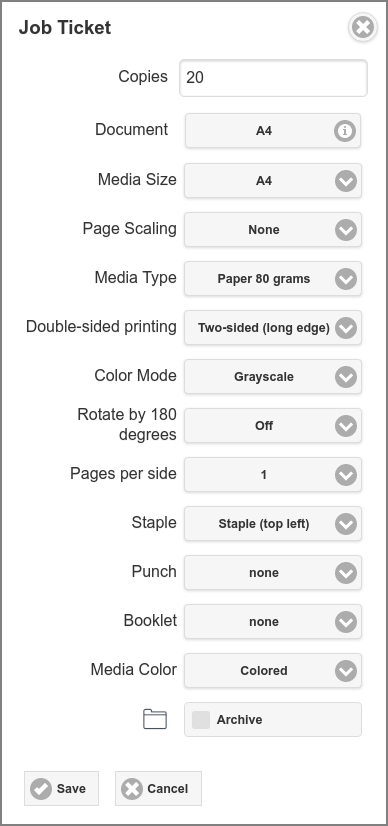
Job Ticket Options can be changed (overruled) by the Job Ticket
Operator. Costs are recalculated after .
Note
Document displays the page size of the PDF source document. The number of Copies can not be edited when Print Delegation is applied for more than one account. So, as long as a single account is involved the number of copies can be edited.
Page Scaling displays the selected value of the print-scaling option.
Important
For Reopened Job Tickets all options are read-only, except for the number of copies.
This dialog pops up after pressing the button in a Job Ticket List Item.
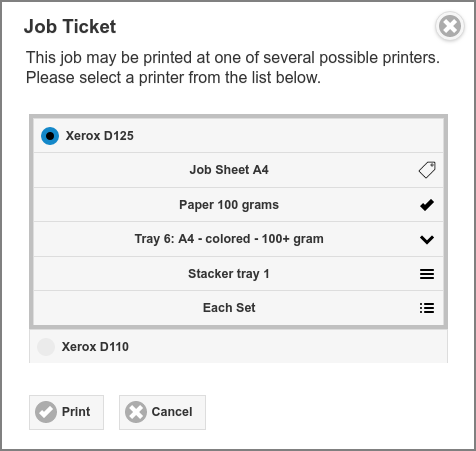
Redirect printers are shown from the Job Ticket Proxy Printer Group, that are compatible with ticket options. See Section 4.8.2.1, “Proxy Printer Identity”.
A selected printer may support the following settings, from top to bottom:
-
Job Sheet Media Source : pick a source that is configured on the printer to hold the job sheet media-type.
-
media-type : This setting is taken from the Ticket. It is a fixed choice in this context and can only be changed in the Ticket Edit Dialog. It is displayed for the operator to verify that the correct media type is loaded in the target media source.
-
media-source: pick a source that is configured on the printer to hold the media-type.
-
output-bin: pick a suitable output bin.
-
org.savapage-finishings-jog-offset : select a finishing that shifts “Each Set” in the output-bin from the previous one by a small amount (or chose “none”).
After pressing the button, constraints are validated. When settings are valid, the dialog closes, and the status of the Ticket will be shown in the list as either Pending, Processing, or Completed.
Note
Printer settings are saved in the Web Session, and used as default for next Job Ticket prints.
-
The last selected printer is used as default for the next print.
-
The last jog-offset choice is used as default for all printers.
-
The last media-source choice of a printer is used as default, if the requested media size can be assigned to this media-source. If not, the first (preferred) media-source that is compatible with the requested media size is used. See Section 4.8.2.3, “Media Sources”.
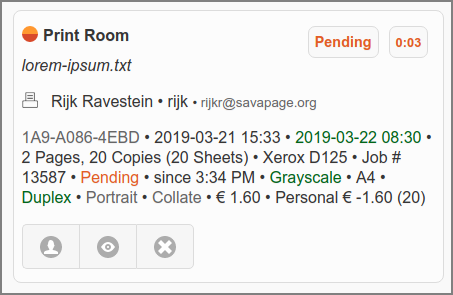
When status is Pending, the job is waiting to be printed. By pressing , the job will be removed from the print queue and the Ticket will show status Canceled in the list.
Optionally the Print Job Supplier and Print Status Supplier are shown at the bottom. In the example below SavaPage supplied the job and PaperCut, as external print manager, supplied the status. When SavaPage supplies both Print Job and Status, this information is not shown.

Note
The top right corner of the job ticket entry displays the elapsed time since the command was issued.
When the job is actually printing, status Pending changes to Processing. By pressing printing is stopped, the job is removed from the print queue, and the Ticket will show status Canceled in the list.
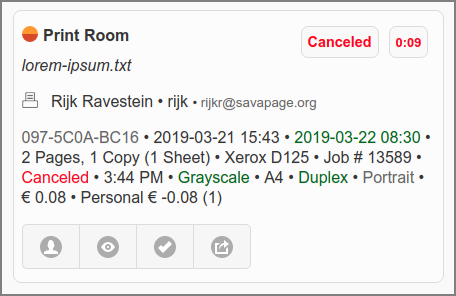
The print job is canceled. By pressing , the Ticket is closed and removed from the list, and the user is optionally notified by email or a Notification Plug-in. to Print again, optionally to another printer.
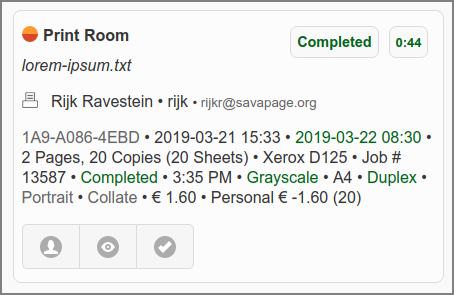
When a ticket has been Completed, the proxy print succeeded and the print costs have been settled successfully with the relevant accounts. By pressing , the Ticket is closed and removed from the list, and the user is optionally notified by email or a Notification Plug-in: see Section 3.5.9, “Job Ticket Print”.
Optionally the Print Job Supplier and Print Status Supplier are shown at the bottom. See remarks at Section 5.2.6.1, “Job Ticket Print Pending”.

This dialog pops up after pressing the button in a Job Ticket List Item.

After , the ticket is effectuated without
proxy printing. This implements the scenario where the Job Ticket Operator
prints the attached PDF with an external program, and registers the printing
occurrence (including financial cost) in SavaPage. After settlement, the
Ticket is automatically closed and removed from the list. And, the user is
optionally notified by email or a Notification Plug-in: see Section 3.5.9, “Job Ticket Print”.
Note
Settle is the only option to charge a Copy Job Ticket.